Note: The links in this post are affiliate links.
If you work from home you know how important it is to have a dependable power source to run your computer, printer, modem, router, lights and other essential work-related gear.
That’s why power interruptions are such a hassle, even when they are relatively short-lived.
Our local power grid isn’t the best so my neck of the woods experiences frequent outages that last anywhere from a few minutes to several hours. And every now and then, an outage can literally last for days.
This post explains what I did to avoid that inconvenience and aggravation in the future.
While generators are awesome and certainly have their place, I’m not too keen on having to pull one out, start it up and connect everything I need to run up to it, only to have the grid power restored within an hour or two.
Our last outage was about a month ago, and it interrupted my work routine for the last time. Right then and there I decided to take my home office off the power grid and install a simple, but effective solar power generation system.
Now keep in mind, this solar setup would only power my office. The rest of the house would remain on the grid since I’m ok with dealing with outages that don’t affect my work.
What’s required to assemble a basic solar power generation system?
Any off-grid solar power setup needs the following at a bare minimum:
1 – Solar Panels to convert sunlight into electric power
2 – Battery(s) to store the electricity generated by the solar panels for later use (at night, for instance)
3 – Solar Charge Controller to convert the voltage and current generated by the solar panels to the levels required to properly and efficiently charge the battery(s)
4 – DC to AC Power Inverter to convert the DC voltage supplied by the battery(s) into AC voltage to run your AC-powered appliances and gadgets
5 – Miscellaneous hardware items to install the above and connect them together (cables, connectors, mounting brackets, fuses/circuit breakers, bolts and screws, etc.)
My solar power requirements
Luckily, the power requirements for my office are minimal:
1 – 65 watts for my primary work PC and monitor
2 – 11 watts for my laser printer in standby mode (plus short 3 second bursts of ~900 watts when it starts up or prints)
3 – 6 watts for my Internet gateway device
4 – 22 watts for LED lighting
As you can see, that adds up to a whopping 104 watts (not counting the short bursts consumed by the laser printer a couple of times each day).
Here’s a list of the specific devices I chose for this project:
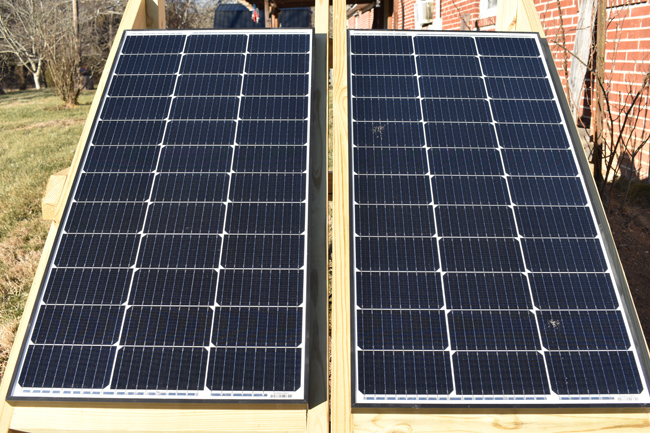
JJN Solar 12 volt/100 watt solar panels (Qty 2)
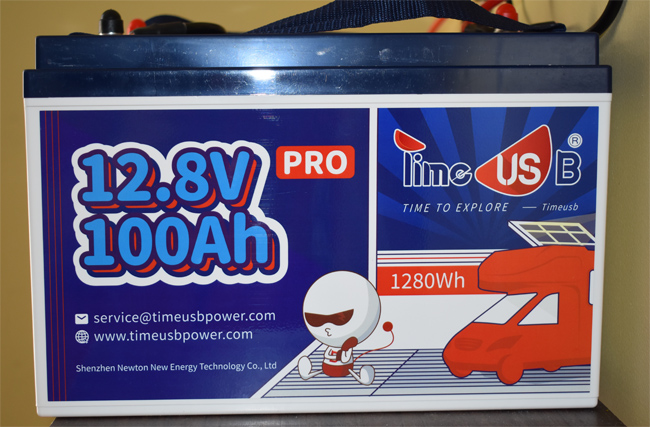
TimeUSB 12.8 volt/100 Ah Pro LifePo4 1280Wh battery (Qty 2)
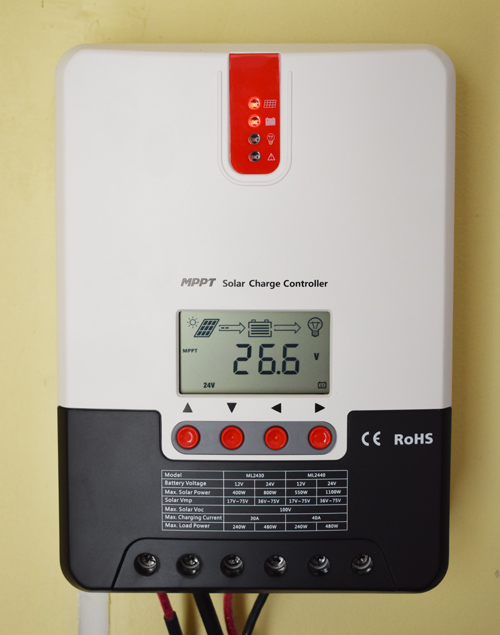
Bioenno Power SC-122430NE 12V/24V MPPT solar charge controller
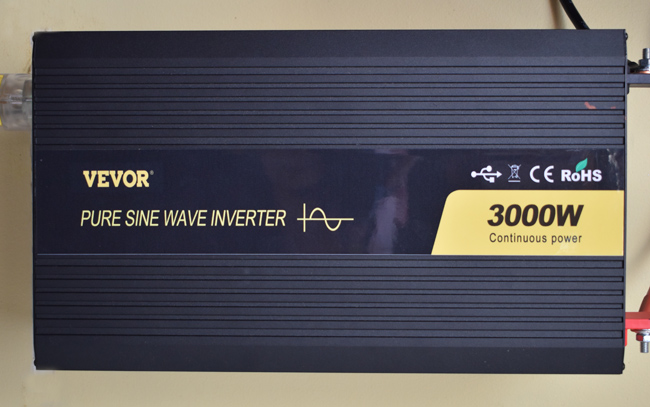
Vevor 3,000 watt 24VDC to 120VAC Pure Sine Wave Power Inverter
Truth be told, I could have selected less expensive gear for my modest solar project and it would have likely been fine, but since this is for my office I wanted to make sure it would easily meet my needs over the long term. And I believe these specific devices will.
Putting it all together
Note: You can see how all of this came together by watching the video at the bottom of the page.
Outside work…
First, I built a stand for the solar panels out of treated lumber and mounted the panels on it.
I then connected the two solar panels in series which doubled the voltage they provide from 12V to 24 volts. (Note: The open-circuit and charging voltages are actually higher.)
Note: There are two reasons why I opted to assemble a 24 volt system instead of a 12 volt system:
a) Since wattage = voltage x current, the amount of electric current flowing through a 24 volt system is only half the current flowing through a 12 volt system when the wattage is the same. This allowed me to use smaller (and therefore much cheaper) cables to connect everything together.
b) Due to the nature of how solar power components work together, a 24 volt system is generally more efficient than a 12 volt system, especially when using an MPPT solar charge controller.

Next, I ran two solar power extension cables from the solar panels into my basement through a run of 1 inch indoor/outdoor conduit, which I buried.
Indoor work…
I mounted the solar charge controller and power inverter on the basement wall near the spot where the solar panel extension cables entered the basement.
A hastily-constructed (and well supported) shelf holds the two batteries.
I connected the batteries in series to create a 24VDC battery bank, then connected the batteries to the charge controller (with a circuit breaker connected between the two).
The charge controller immediately powered up and determined that it was connected to a 24 volt battery bank. Everything was automatic – I didn’t have to change any settings at all. In fact, it even knew that it was connected to LifePo4 lithium batteries instead of lead acid batteries.
Next up was the connection between the battery bank and the inverter…
As I mentioned above, the power requirements of the gadgets in my office are minimal. In fact, if it hadn’t been for the short 900 watt bursts of power drawn by the laser printer a 300 watt inverter would have been plenty.
But I ended up having to go larger on the inverter due to those infrequent, but necessary power bursts. And besides, I wanted to build in some room for future growth – hence my decision to go with a 3,000 watt inverter.
After the batteries were connected to the charge controller and power inverter (through a second circuit breaker), I connected the cables from the solar panels to the charge controller.
Just as with the batteries, the charge controller immediately detected that it was connected to a 24V solar panel array. As soon as I closed the circuit breaker it began charging the batteries immediately.
Here’s a photo of all the indoor components of my solar power generation system, securely mounted and connected together via the appropriate cables and circuit breakers.
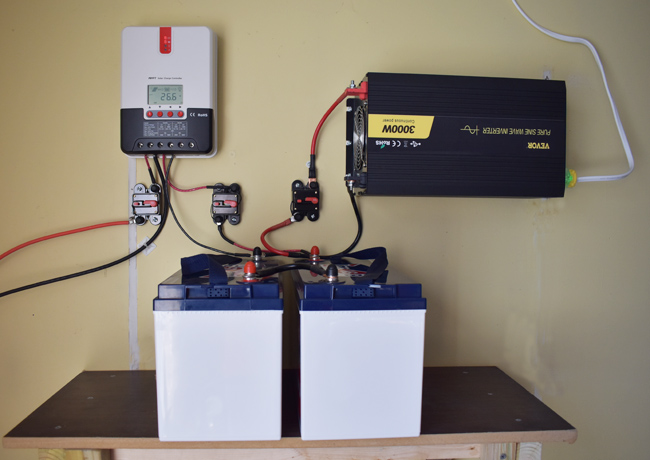
In case you’re wondering, the circuit breakers serve two very important functions:
1 – They protect the components they are connected to from damage due to a potential short circuit.
2 – If the need arises, they make it easy to disconnect one or more of the components from the system simply by switching the relevant breaker(s) into the open state.
Also, in case you’re wondering, the inverter really is mounted upside-down.
Why? because that allowed me to keep the large 4 gauge red and black power cables connecting the battery bank to the inverter as short as possible (this is very important when connecting solar components to one another).
My takeaway from this project
I’m very happy with this setup, both as a whole and with each individual component. Here’s why:
1 – The two JJN Solar 12 volt/100 watt solar panels are very well made and they produce plenty enough electricity to power my office equipment and charge the batteries at the same time during the peak sunlight hours.
These panels are sturdy, easy to install and easy to connect to the rest of the system thanks to their handy MC4 connectors.
2 – The two TimeUSB 12.8 volt/100 Ah Pro LifePo4 1280Wh batteries connected in series have plenty of capacity to store the power my gear needs to make it through the night until the next sunny day can start recharging them again.
The lowest I have seen the charge of my battery bank has been 74%, and that was after three straight days with overcast skies.
3 – The Bioenno Power SC-122430NE 12V/24V MPPT solar charge controller is simply awesome.
It immediately (and automatically) recognized the voltage of my battery bank (24V instead of 12V) as well as the battery chemistry (LifePo4 Lithium instead of Lead Acid).
It also automatically detected the voltage output of the solar panels and converted the excess voltage coming in from the panels into extra current for charging the batteries.
In other words, this controller ensures that none of the power produced by the solar panels is wasted (one of the most important advantages of MPPT charge controllers in general).
4 – The Vevor 3,000 watt 24VDC to 120VAC Pure Sine Wave Power Inverter is well constructed and easy to install.
The extra large capacity leaves plenty of room to grow in case I ever decide to expand this system beyond just powering my office.
Another thing I love about it is the noise it generates. There is none (at least right now).
This thing handles the meager 104 watts (and occasional 900 watt surge from the laser printer) with ease.
I have yet to hear the fan turn on (which it surely will if I ever start drawing considerably more power from it) so I can’t tell you how loud the fan is, but as of right now it’s completely silent (and completely cool to the touch as well).
5 – This system meets my current power needs extremely well. And to be totally honest, it turned out a lot better than I had originally expected.
Bottom line
If you’re thinking about putting together a small solar power generating system of your own, you can definitely get by with cheaper components than the ones I discussed above.
That being said, if you’re looking to build a quality system that’ll last for years while providing plenty of room to grow, I believe the devices I used will serve you well and end up being a great investment.