 Have you ever upgraded your PC’s hard drive and sold the old one on eBay or given it to a friend to use in his/her PC? How about loaning someone a USB flash drive or memory card?
If you have ever given a used storage device to another person for any reason, chances are they could have retrieved your files from that drive, even if you had deleted them or formatted the drive before giving it to them!
When you instruct Windows to “delete” a file, the file itself is not removed the the drive. Instead, the operating system simply marks that file as unavailable and makes the space it takes up on the drive available for use by other files in the future. The new owner of your old drive could easily use a file recovery utility like Recuva to retrieve every file on that drive that hasn’t already been overwritten by new ones, even if the drive has been formatted!
As you can see, simply formatting a drive or “deleting” all the files stored on it is risky business if you plan to pass it on to another person because it leaves your files and sensitive information at the mercy of snoops and thieves. The only way to make sure your files and data are gone forever is to “wipe” the drive by over-writing every nook and cranny of the storage area(s) with new, useless data.
There are many utilities on the market that will truly erase all the data from your drives. The one I use and recommend is called Roadkil’s Disk Wipe. I know, it’s a weird name, but it works extremely well, it’s very easy to use and it costs absolutely nothing! Here’s how to get it and how to use it:
1 – Click here to download the zipped Diskwipe.zip folder to your Desktop.
2 – Right-click and select Extract all.
3 – Open the newly created diskwipe folder and double-click on diskwipe.exe.
4 – Uncheck the box beside Always ask before opening this file and click Run.
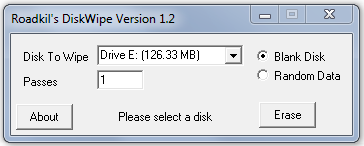
Note: For steps 5 – 8 please refer to the screenshot below.
5 – Select the drive that you’d like to securely erase. Be careful here, because selecting the wrong drive will ERASE the wrong drive, and the data will be unrecoverable.
6 – Select the number of passes. The more passes, the more secure the erasure. If you’re selling the drive or giving it to stranger I suggest choosing at least two passes. A single pass will be fine if you’re giving it to someone you trust.
7 – Select either Blank Disk or Random Data. The Blank Disk option will write all logical “zeroes” to every storage area on the drive where Random Data will write…well, exactly that. Either choice is fine, but I usually choose Random Data.
8 – Click Erase. The erasure process could take anywhere from a second or two to several hours depending on the drive type/size and the number of passes selected.
