 A while back a local business owner asked me if there is a way to move the ‘My Documents’ folder from its default location on the hard drive to a USB flash drive.
His routine was simple, yet time-consuming. At the end of every workday he copied all of his data files from the ‘My Documents’ folder on his hard drive to a 64GB thumb drive so he can work on them some more at home. The next morning he copied them back onto the hard drive.
I told him how to make the change, and now his files are automatically saved directly to his thumb drive regardless of where he happens to be working. Since he is quite happy with the new setup, I thought some of you might be interested in doing the same. The instructions that follow will explain how to set it up, step-by-step, in either windows 7 or Windows 8.
Important: There is one important caveat to consider before moving your ‘My Documents’ folder to a USB flash drive. Flash drives are notoriously finicky and they either become corrupted or simply stop working more frequently than hard drives do. Making a habit of right-clicking on the thumb drive in ‘Computer’ and then clicking Eject greatly reduces the chances of file system corruption and data loss, but it is by no means fool-proof.
That being said, you are certainly free to accept the risk of data loss explained in the paragraph above and follow the instructions below to move your ‘My Documents’ folder to a USB flash drive. But by doing so you agree that if the earth’s poles reverse polarity causing all the world’s planes and ships to travel in the wrong direction or if you lose all the files stored on your thumb drive, it won’t be the fault of your humble tech blogger. Just sayin’.
Caveats having been understood and accepted, here are the steps required to move your ‘My Documents’ folder from your hard drive to a USB flash drive:
First, prepare the flash drive for the move…
1 – Insert a USB flash drive into one of your PC’s USB ports. This drive should be large enough to hold all the documents currently stored in your ‘My Documents’ folder with plenty of room to spare for adding more. And given the importance of its new intended use, it should probably be brand new.
2 – Press the Windows+E key combination to open the ‘Computer’ dialog box.
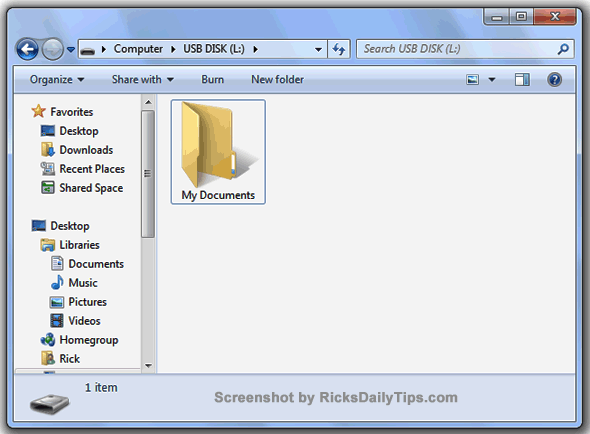
3 – Double-click on the drive letter representing your thumb drive and create a new folder called My Documents.
When you’re done your ‘Computer’ dialog box should look something like this:

Now, move the ‘My Documents’ folder from the hard drive to the flash drive…
1 – Press Windows+E again to open another ‘Computer’ dialog box.
2 – Navigate to your My Documents folder. Its default location is typically found at C:\Users\account-username where the account-username part would be replaced with your own Windows username. In my case, my Windows username is simply Rick, so when I’m logged into Windows on my PC the location of the ‘My Documents’ folder is C:\Users\Rick.
3 – Right-click on the My Documents folder and click Properties.
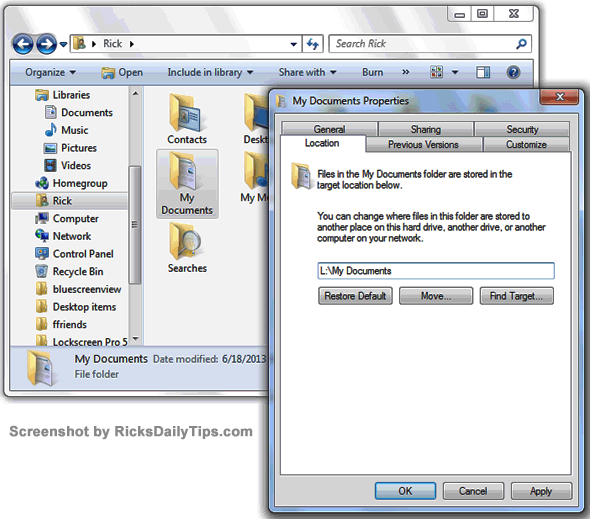
4 – Click Location.
5 – Type the path to the ‘My Documents’ folder you just created on the flash drive into the text input box. For example, if your flash drive is designated as drive L:, you would enter this:
L:\My Documents
You should now see something like this:

6 – Click Apply. You will be asked if you wish to move all the files stored in the old location to the new one. This is up to you, but I recommend clicking No and manually copying them over later. That way if something goes wrong you will still have your files tucked safely away in the ‘My Documents’ folder on your hard drive.
7 – Click Ok.
There you go! From now on all the programs that used to save your data files to the ‘My Documents’ folder on your hard drive will save them onto your thumb drive instead. Just remember that caveat I mentioned earlier. Storing your precious files only on a single thumb drive is dangerous business, so be sure to back it up often!