 Do you have a WordPress blog? If so, you’re probably concerned that hackers could break into it and either deface it or hi-jack it for their own illicit purposes.
Well, I’m here to tell you that your concern is well-founded.
Hackers are always looking for vulnerable blogs to attack, and with WordPress being the most popular blogging platform on the Internet, the blogs powered by it are bombarded daily with hacking attempts.
WordPress is a lot like Microsoft Windows in that respect. They both attract the bad guys like candy attracts ants simply because there are so many potential targets.
If your blog is already popular you can bet that it’s already being pounded by brute force password-guessing attempts and other type of hacking attacks on a daily basis.
And even if your blog is still relatively new it won’t be long before it lands in the cross-hairs.
If you’d like to find out how often your blog is currently being attacked, just install the awesome Wordfence security plugin mentioned in this post. Wordfence is free and it’ll really open your eyes to the number of hacking attempts your blog is being subjected to each and every day. The results will probably shock you!
I also recommend that you enable Two-Factor Authentication on your blog by installing the Google Authenticator plugin that’s also mentioned in this post.
Two-Factor Authentication will lock down your WordPress Dashboard’s login page by requiring anyone who tries to log in to your Dashboard to enter a code that’s sent to the Authenticator app on your mobile phone.
If the person trying to log in to your blog doesn’t have possession of your phone they won’t be able to log in, even if they know your password!
Enabling Two-Factor Authentication is probably the single most effective way to prevent bad guys from logging into your blog and causing you all kinds of grief.
Now that you have your blog’s login page locked down, let me tell you about another huge security hole that you need to plug.
By default, anyone on the Internet can view the files contained in any directory in your WordPress installation that doesn’t contain an Index.php file. And unfortunately, there are several important directories that don’t have one.
The “feature” that allows the viewing of the files in those unprotected directories is called “Directory Browsing”, and it’s enabled by default in most WordPress installations.
It’s easy to check to see if Directory Browsing is currently enabled on your blog. All you have to do is type the URL to your blog’s “Uploads” directory into the address bar of a web browser.
For example, if your blog’s domain name was example.com you would type the following in your browser’s address bar:
http://www.example/wp-content/uploads/
Go ahead and try it right now. Replace the example.com part with your own blog’s domain name and type it into the address bar in Google Chrome, Firefox, Microsoft Edge or any other browser and see what’s displayed on the screen in response.
Do you see a list of filenames? If so, Directory Browsing is enabled on your blog, and that’s a bad thing!
However, if you see either a “404 – File not Found” error page or a “Forbidden” message, that means Directory Browsing is disabled (and you can rest easy).
Directory Browsing is bad for couple of reasons:
1 – Hackers can view (and optionally download) all the images and other files contained in your blog’s “Uploads” directory.
2 – They can see which plugins you’re using by viewing the contents of your blog’s Plugins directory, then Google those plugins to see if any of them contain security holes they can exploit to break into your blog.
In case you didn’t know, guessing (or stealing) your WordPress login information isn’t the only way a hacker can break into your blog.
Buggy plugins can serve as open doors into your blog’s Dashboard and file system, and if a hacker can determine which plugins your blog is using he/she can often find a security hole in one of them to exploit.
Now that you know what Directory Browsing is and how dangerous it can be, you’re probably wondering how to disable it.
Unfortunately there’s no handy “Settings” option that you can toggle off to disable Directory Browsing, but you can easily disable it by adding a single line to your blog’s .htaccess file.
I’ll be happy to tell you exactly how to do that, but first I must ask that you read and agree to my semi-standard disclaimer:
The .htaccess file is one of the most important files in your entire WordPress installation. It controls how your blog is viewed and even who is allowed to view it.
If you make an error while editing this file you can easily change your blog’s appearance (ALWAYS for the worse) and/or end up locking yourself out of your own blog. Even worse, it can prevent your blog from loading in your visitors’ browsers.
If you decide to edit your .htaccess file to disable Directory Browsing, you do so at your own risk. You agree that if your horse starts mooing like a cow, your car starts driving backwards while in “Drive” or your blog starts acting up or fails to load, it won’t be the fault of your humble tech blogger.
If you agree with everything I said above, feel free to follow the steps below to disable Directory Browsing on your WordPress blog AFTER making a new backup of your blog (just sayin’):
1 – Use your favorite FTP program (I really like the awesome and free FileZilla) or the File Manager utility in your web server’s CPANEL (or other control panel) to download the .htaccess file from your blog’s home directory to your computer’s Desktop.
2 – Open the .htaccess file with Notepad (or preferably Notepad++ if you have it installed).
3 – Click File>Save As… and save the unchanged file using the filename .htaccess-bak to create a backup copy of the original .htaccess file.
Note 1: Be sure to change the file type to “All files…” or “All types…“.
Note 2: Having a backup of the original .htaccess file on hand is important because if something should go wrong you can simply change the filename of the backup file back to .htaccess and upload it to your server to get your blog back up and running right away.
3 – Close the renamed file and reopen the .htaccess file in either NotePad or NotePad++.
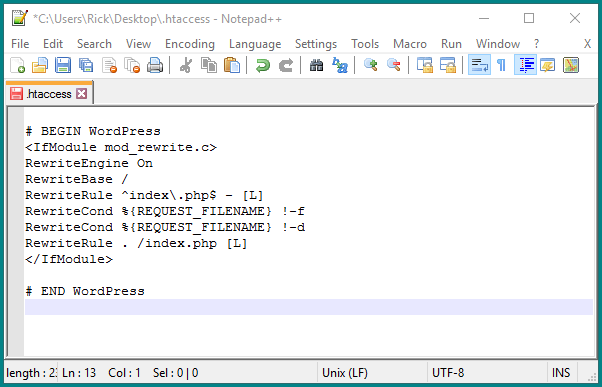
The file should now look something like this, perhaps with slight differences:

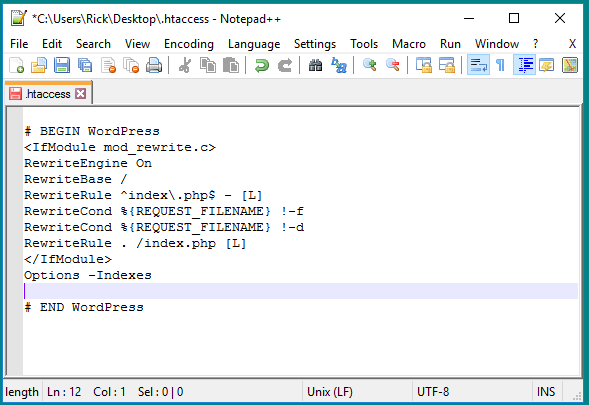
4 – Add the following line at the bottom the file just above the # END WordPress line:
Options -Indexes
The edited file should look exactly like the original file, only with the new line added:

5 – After you’re sure you’ve added the extra line correctly (without making ANY other changes), click File>Save to save the edited .htaccess file.
6 – Use your FTP program or web server’s CPANEL File Manager utility to upload the edited .htaccess file to your blog’s home directory.
7 – Load your blog in a web browser and make sure it still loads (and looks) as it did before. If it does, you can move on to step 8.
If your blog looks different than it did before (or if it fails to load at all), you’ve made a mistake and you’ll need to rename the .htaccess-bak file to .htaccess and upload it to your server. That should get your blog back up and running right away.
8 – Verify that you have successfully disabled Directory Browsing by typing the following into your browser’s address bar:
http://www.example/wp-content/uploads/
You’ll know you’ve successfully disabled Directory Browsing on your blog if you see a “404 – File not Found” error page instead of a list of filenames in your browser window.
That’s all there is to it. Now that you have disabled Directory Browsing on your WordPress blog you can rest assured that hackers won’t be able to exploit any unprotected directories in order to figure out a way to break into your blog!