 Wouldn’t it be nice to be able to use your laptop, tablet or other Wi-Fi enabled device at any place where there is a decent 3G or 4G signal available?
Well, if you have a smart phone running Android 2.2 or later you have everything you need to create a Wi-Fi hotspot that can provide Internet service for up to five Wi-Fi enabled devices!
The Android feature for creating a hotspot is called Tethering, and here are the steps for turning it on in your phone:
1 – From your Android phone’s Home screen, tap the Menu button or screen location to go to the Settings screen.
2 – Tap Settings.
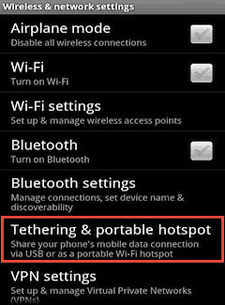
3 – Tap Wireless & networks.
Note: The specific wording of your phone’s menu options for the steps that follow might vary a bit from these instructions, but they should still be rather intuitive.
4 – You should now see a menu option labeled either “Portable Wi-Fi hotspot” or simply “Tethering”. Depending on your phone, either check the box beside that menu item or tap it to turn on the tethering feature. Once your Wi-Fi hotspot has been activated you should receive a message to that effect in the notification bar.
5 – At this point you can change the basic settings for your hotspot if you wish and even replace the default password with one of your own (strongly recommended if you’re in an area populated with other people).
Your Android phone’s new Wi-Fi hotspot should now be active and password protected. It should show up on your Wi-Fi enabled devices along with any other available networks. Simply enter the password you just created for the hotspot, connect to it, then enjoy your Internet connection!
Note: Be sure to check with your cell phone carrier before using your Android phone as a hotspot. Most of them charge an extra monthly fee for tethering. Also be aware that it’s easy to exceed your monthly data usage allotment when tethering, especially if you’re connecting with a latop or tablet.