 Periodically clearing your browser cache and web history is an effective way of ensuring a fast browsing experience, preventing problems with your favorite websites and protecting your privacy while online.
But while clearing out your browser’s clutter isn’t all that difficult, remembering how and when to do it can be a problem.
Thanks to a nifty browser extension called History Eraser, you can now clear out every trace of your online activities with just two mouse clicks! History Eraser clears pretty much anything that Chrome stores during a typical browsing session:
- Download history
- Browser cache
- Cookies and other site and plug-in data
- Saved passwords
- Saved form data
- Lots more
Installing History Eraser is easy. Here’s how:
1 – Visit this page with your Chrome browser.
2 – Click the Add to Chrome button.
3 – Click Add extension.
4 – Click Install.
5 – Click Add again.
6 – Click Next, then close the browser window by clicking the X in the upper right hand corner.
Using History Eraser is easier still:
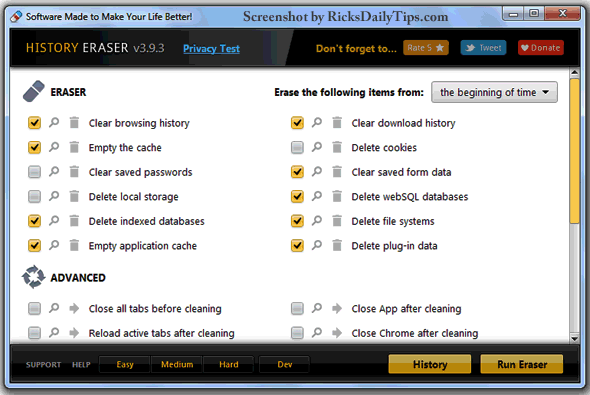
1- Once History Eraser has been installed, you’ll see an icon in the upper right-hand corner of the screen that resembles a pencil with a blue eraser on the end. Click this icon to load the History Eraser settings window. Here is a screenshot:

2 – Choose the browser history items you wish to clear by checking the appropriate boxes.
3 – Click Backup Options to save your choices. You can now skip the option selections when you run History Eraser in the future and proceed directly to step 4 below (hence 2-click cleaning!).
4 – Click Run Eraser.
That’s all there is to it. Now you can clear out every morsel of your browsing history with just two mouse clicks while avoiding Chrome’s Settings menu altogether.
If you like this post you can get my latest tips in my weekly RicksDailyTips Email Newsletter. Sign up for free at the bottom of this page!