 Question from Emil P.: Ever since I updated my computer to Windows 10 it’s been hanging up at shutdown.
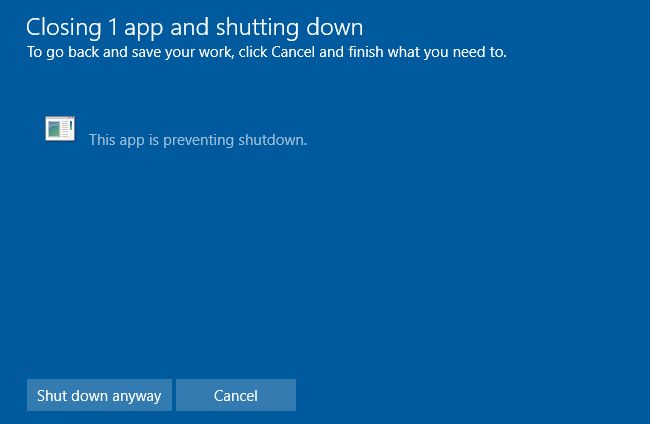
It displays a window saying that the system is closing X number of apps and shutting down.
But then it says that an app is preventing Windows from shutting down and asks if I want to shut down anyway or click cancel.
Sometimes it will name the app that’s hanging the shutdown but sometimes it won’t.
This is a screenshot of one of these messages:

My question: Is there any way to have the system just skip this message and shut down immediately? I always click “Shut down anyway” so I don’t see what difference it would make.
Rick’s answer: I know those messages are irritating, Emil. I’m not all that fond of them myself.
But that being said, Windows displays these Shutdown confirmation dialogs when an app prevents the system from shutting down for a reason.
When an app “hangs” as you call it, it’s because Windows assumes that it might contain unsaved information that you would lose if the system were to finish shutting down immediately.
In other words, it’s giving you a chance to save any unsaved work that might be in the app before it’s lost forever due to the system shutting down.
As you can probably guess, I’m hinting that it might be to your advantage to let sleeping dogs lie (or in this case, sleeping apps) and allow Windows to keep displaying this warning.
After all, there might come a time when you really are at risk of losing unsaved information by allowing Windows to shut down right away without giving you this warning.
In other words, I urge you to give this decision careful consideration before you make it.
Now, that “warning” notwithstanding, if you really want to force Windows to shut down immediately when you click the Shutdown button I’ll certainly tell you how to do it.
After all, I’m a firm believer in allowing folks to make their own informed decisions, and you have now been informed.
To that end, if you still want to follow through with this I’ll tell you how to do it. But first I must ask you to read and agree to my semi-standard disclaimer…
Important: The procedure that follows involves editing the Windows Registry, a task that carries with it certain risks. For example, one mis-typed character could cause your system to become unstable or even refuse to boot up into Windows as it normally does.
Therefore, by following the steps below you agree that if the sun turns from yellow to green, your cow starts giving clabbered milk or your computer starts performing all kinds of weird tricks after making the Registry edit detailed below, it won’t be the fault of your friendly tech blogger.
In other words, you agree that you’re doing this at your own risk.
If you agree with everything I said above, feel free to follow the steps below to force your system to shut down immediately without giving you any type of warning or an opportunity to save any unsaved work:
1 – Press the Windows+S key combination to open a Search box.
2 – Type the word regedit into the Search box, then select regedit from the list of search results.
3 – Click Yes in response the the “User Account Control” dialog after it pops up.
4 – Make a backup copy of the Registry by clicking File>Export. (This will give you a chance to restore the Registry if you make a mistake.)
5 – Navigate to this Registry key:
HKEY_CURRENT_USER\Control Panel\Desktop
(Important: Be sure to click on the word Desktop, not the arrow beside it!)
6 – Right-Click in a blank area of the right-hand pane and select New>String Value.
7 – Give the string value you just created this name:
AutoEndTasks
8 – Double-click the new AutoEndTasks string value you just created and assign its “Value data” to 1.
9 – Click OK.
9 – Close the Registry Editor by clicking File>Exit.
That’s all there is to it. You’re done!
From now on when you click Shutdown your PC should shut down immediately without pausing to ask you to confirm it.
If you ever change your mind and decide that you want to start receiving the confirmation dialogs again, simply repeat the steps above and change the “Data value” in step 8 to 0 (that’s a numeric zero, not the letter O).
Bonus tip: If you happen to be an advanced user who makes use of the Registry Editor on a regular basis you can pin the Regedit utility to the Windows 10 Start Menu. This post explains how.
Do you have a tech question of your own for Rick? Click here and send it in!
If you think your friends would like this post, I’d love you to share it! Thanks a bunch!