 Note: The links in this post are affiliate links.
Do you have an older garage door opener that can only be activated by physically pushing a button on the wall of your garage?
Did you lose the remote to the opener and simply can’t find a compatible remote to replace it?
Or perhaps the radio receiver in the opener has stopped working, rendering the remote you have inoperable.
Whatever the reason for not having a working remote, you can add one to virtually ANY garage door opener that can be activated by pressing a button on the wall.
And guess what? It’ll only cost you around 20 bucks, which is way better than buying a brand-new garage door opener, if you don’t have a few hundred bucks to spare.
What that button on the wall actually does
The button you press to open (or close) your garage door is nothing but a momentary switch. Pressing the button momentarily closes the switch, which in turn activates the opener.
What a garage door remote does
A garage door remote is basically a small radio transmitter that sends an encrypted code to the opener telling the opener that you want to open (or close) the garage door.
When the opener receives the transmitted code it activates a relay that causes the opener to spring into action.
If the door is closed when the code is received, the opener will open it.
If the door is already open, it will close it.
In other words, a remote does the same thing the button on the wall does. It just does it wirelessly.
How you can add a remote to your existing garage door opener
Several companies sell remotely controlled switches that can take the place of your garage door opener’s original remote and receiver.
Simply connect one these simple devices to your opener and you’ll have a working remote in minutes.
The prices of these remotely controlled switches range from just a few dollars to several hundred, but the one I use and recommend cost me a little more than $20 on Amazon.
That price may well have changed since the time I purchased mine, but it still should be fairly close to that amount.
This awesome device is the Solidremote Secure Wireless RF Remote Control Relay Switch.
I know that name might make the device sound complicated, but it’s really pretty simple to understand and relatively easy to install.
Note: Although most anyone with a few hand tools and the ability to follow instructions can install this remote/receiver combo, you can always hire a pro or ask a handy neighbor for help if you need to.
And if you don’t feel comfortable enough with your own skill level to get the job done safely, I strongly recommend that you do just that.
What you get with this remote/receiver package
The package you receive will contain all of the following three items:
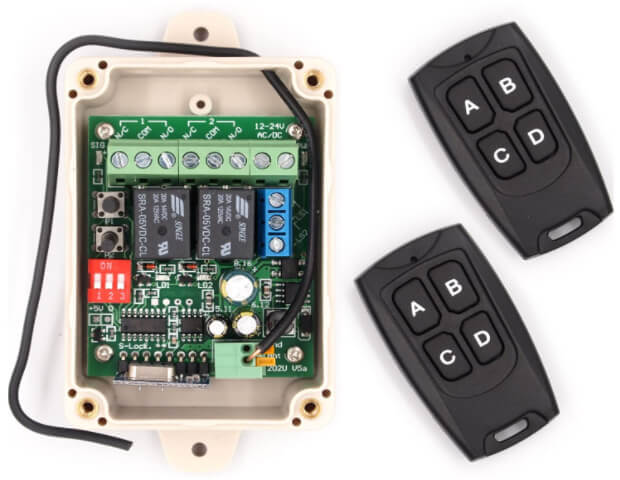
1 – The receiver (a small rectangular plastic box containing an electronic circuit board)
2 – Two RF radio remote control units
3 – A sheet of paper containing written instructions
Here’s a photo showing the receiver (with the cover removed) and the two remotes:
What you won’t get with this kit
This kit DOES NOT come with a power supply to power the receiver. You will need to provide your own power supply.
The good news is you probably already have an unused power supply that will work with it stashed away somewhere in your house right now.
All you need is an unused AC adapter like the ones that come with all manner of electronic devices.
The voltage the adapter puts out can range anywhere from 12 to 24 volts DC so most any adapter that provides at least 12 volts will work.
Note: If you’d rather just purchase an AC adapter that you won’t have to alter by cutting the wires, I recommend this one since it comes with a small adapter with screw terminals.
If you’d rather save a few bucks by using an adapter you already own, just go through your collection of no-longer-used AC adapters and find one that works in the 12-24 volts DC range.
Here’s a photo of the AC adapter I use with my receiver:
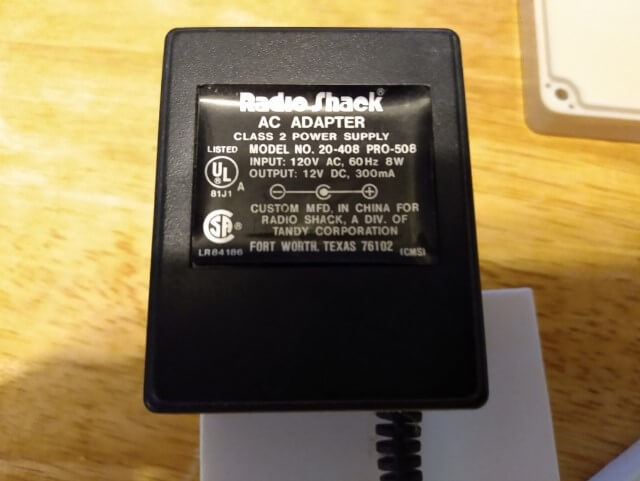
As you can see, this is just an old 120 volt AC to 12 volt DC adapter that was used to power some long-abandoned gadget I had purchased at Radio Shack.
What this remote/receiver kit will do for you
This kit will control either one or two garage door openers, your choice.
You can either program both remotes to control the same opener or program each remote to control a different opener.
Of course you’ll need to wire the receiver to control two openers if that’s your goal. I’ll provide step-by-step instructions for wiring everything up below.
How to wire the receiver to the AC adapter and garage door opener
Important: As I mentioned above, you should only wire this system up yourself if you feel comfortable in your ability to work safely with hand tools, electronic gadgets and electricity.
If not, I strongly recommend that you hire someone who has those skills to do it for you.
If you decide to proceed on your own, the first thing you need to do is wire the AC adapter to the receiver…
Note: If there is an AC outlet available near your garage door opener you can mount the receiver onto the ceiling of your garage near the opener. If not, you can mount the receiver near the outlet that’s closest to the opener and run a wire from the receiver to the opener.
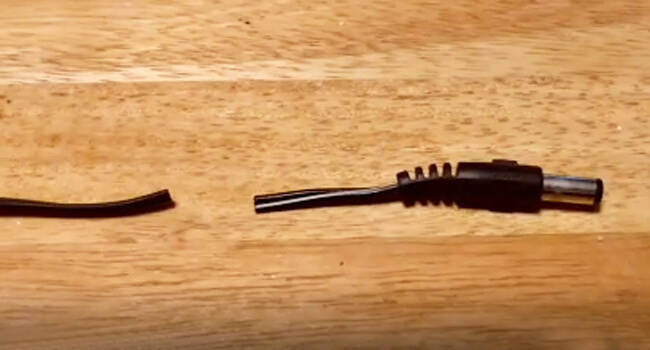
1 – Make sure the AC adapter IS NOT plugged into an electrical outlet and then cut the plug off of the end of the wire. You can simply throw the unneeded plug away.
Here’s a picture that shows the wire from my AC adapter with the plug cut off.
2 – Peel the two wires apart for a couple of inches from the end, and then strip back the insulation on each wire about 1/4 inch.
3 – Twist (or roll) the now-bare stranded wires between your thumb and forefinger to prevent the individual strands from coming apart as you insert the wires into the terminals on the receiver.
4 – Insert the two wires from the AC adapter into the same round hole the black antenna wire is sticking out of.
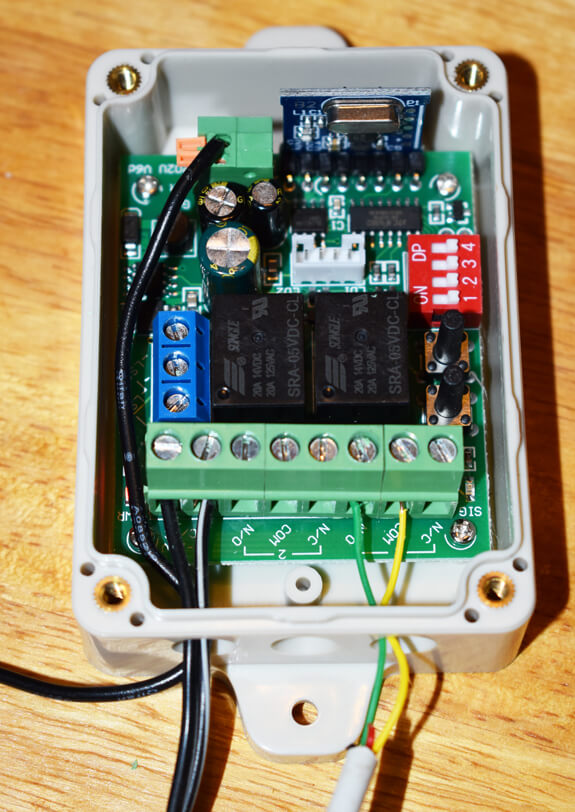
5 – While viewing the receiver with the long green terminal bar at the bottom, loosen the two screws on the far left end of the terminal bar.
6 – Insert the ends of the two wires from the AC adapter into the two square holes at the left end of the terminal bar. These square holes should match up with the two screws you loosened in step 5 above.
Note: Don’t worry about which wire goes in which hole because polarity doesn’t matter with this device.
7 – While holding the wires in place, tighten both screws until they are firmly holding the wires in their proper positions inside the square holes.
The next thing you need to do is wire the receiver to the garage door opener…
1 – Important: Unplug the garage door opener from the electrical outlet that’s powering it.
2 – Trace the wires from the button you push on the wall back to their corresponding terminals (screws) on the opener. Those are the terminals you’ll connect the receiver to.
3 – Connect a length of two-conductor wire to the two terminals on the opener that you identified as the ones that are connected to the wall button.
You can use most any type of copper wire for this, but I used a length of four-conductor outdoor telephone wire to connect mine. I used the yellow and green wires and simply cut the red and black wires off at the ends.
4 – Connect the other ends of the same two wires to the COM and N/O terminals at the far right end of the green terminal strip inside the receiver.
Just leave the terminal at the far right end open and connect the wires to the second and third terminals from the right.
5 – Plug the garage door opener back into its electrical outlet.
Now everything is wired up for controlling one garage door opener with one remote.
Note: If you wish to use this receiver to control a second garage door opener with the same remote simply connect the second opener to the other pair of COM and N/O terminals and program the “B” button on the remote to control it.
If you wish to use the other remote to control the second opener simply wire up the second opener as instructed in the paragraph above and then program the “A” button on the second remote as directed via the written instructions that came with the kit.
Here’s a photo showing the wires from the AC adapter and one garage door opener connected to the receiver:
Programming the remote
Now that everything is wired up you need to program one of the remotes so it can communicate with the receiver to open and close the door…
1 – Plug the AC adapter into an electrical outlet. The power indicator LED should light up.
2 – There are two buttons on the right side of the circuit board between the green terminal strip and the red dip switch.
Press and hold the button labeled PRG1 (the bottom button) until the SIG LEG lights up, then release the button.
3 – Pick up the remote you wish to use to open this garage door and press and hold the button labeled “A” until the SIG LED flashes three times, then release the button.
That’s all there is to it. The remote should now be programmed to open and close the garage door.
Testing the remote
You can now test the remote by simply pressing the “A” button. If everything is wired correctly and the remote is programmed properly the opener should immediately spring into action and either open or close the garage door (depending on it’s state before the button was pressed).
If pressing the button doesn’t operate the opener as it should that means either something isn’t wired correctly or the remote didn’t get programmed correctly. If so, follow the directions above and try again.
Video introduction
Here’s a short video that provides a little more info about the SolidRemote Wireless Relay Switch. Check it out:
Conclusion
You don’t have to settle for a garage door opener that can’t be opened from inside your car or outside your garage.
And you don’t have to replace a perfectly good opener simply because you can’t find a replacement for a lost remote.
Just get yourself one of these awesome Solidremote Secure Wireless RF Remote Control Relay Switches and you’ll be good to go!